MOVIN TRACIN Stage · Setup
Stage 1 · Calibration
On this page
Calibration combines every LiDAR view into one 3D scene. Run it after the first installation, whenever a sensor moves, or when walls and floors look doubled.
Before you start: clear the stage, power and connect every sensor, and have the calibration wand ready.
If the sensors are already calibrated but the floor or the forward direction looks wrong, skip the full run — see Adjust the stage alignment only.
If nothing has changed since the last show, select Open Settings › on the stage card to go straight to Stage 2. It appears only while a valid calibration is saved.
Connect sensors
- Select Calibration → Connect sensors in the left navigation, then select Connect in the right panel. The sensors connect one by one.
- Check that every installed sensor shows Connected. If one is missing, check its power and cable, then select Reconnect. A sensor plugged in later shows Ready to connect — select Connect to bring it in.
- Select Calibrate sensors on the left, then Calibrate in the right panel.
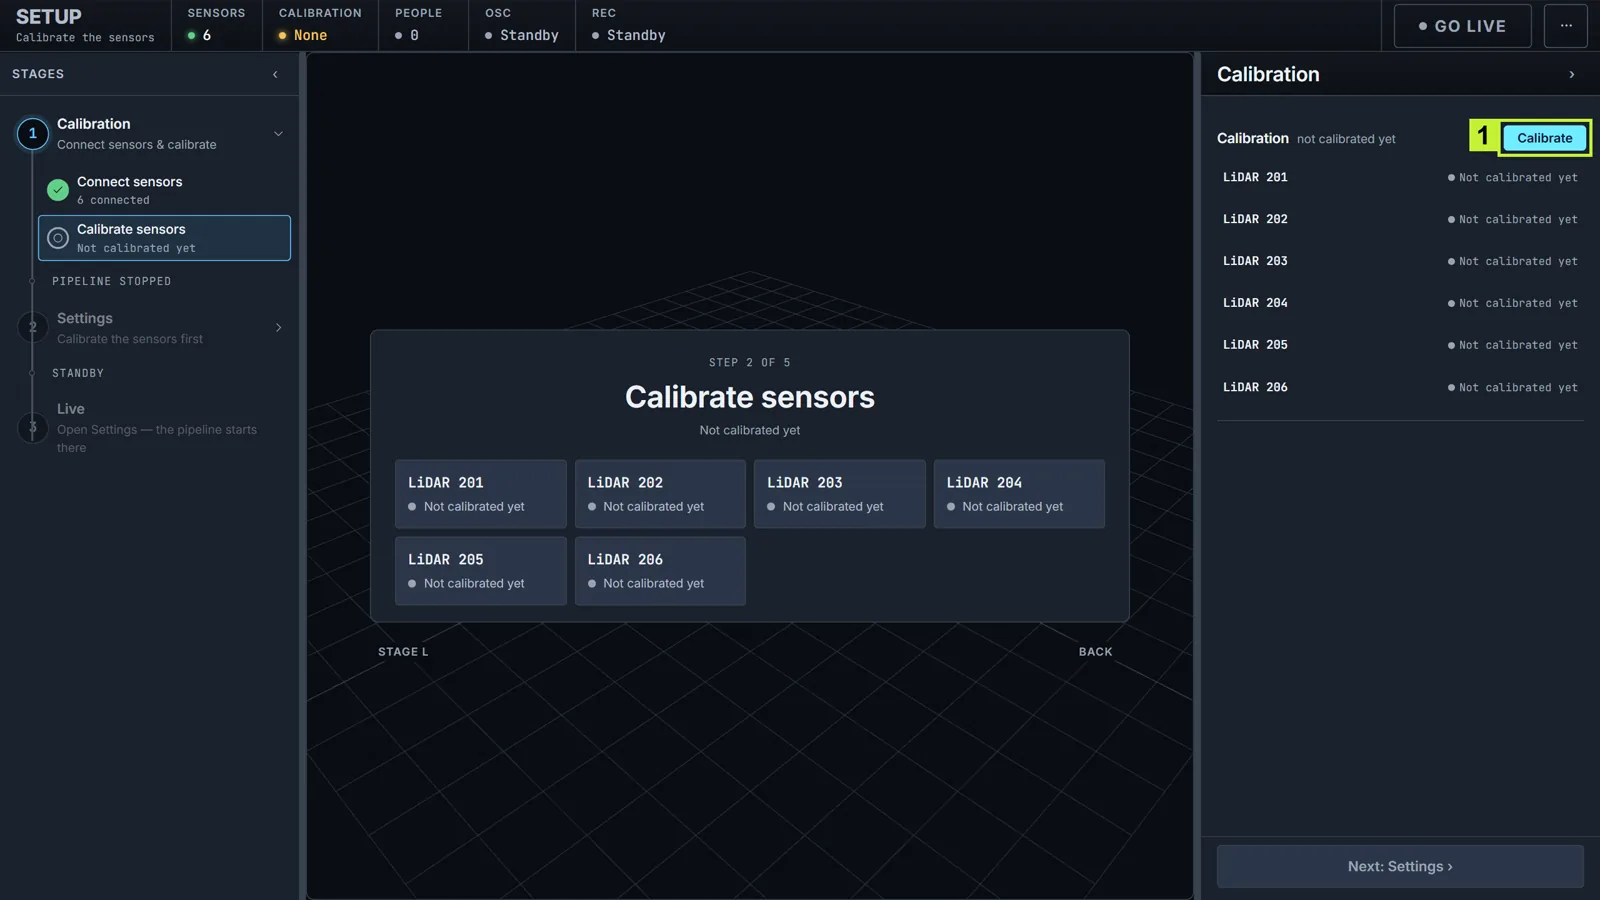
Calibrate opens the six-step wizard below.
1 · Setup
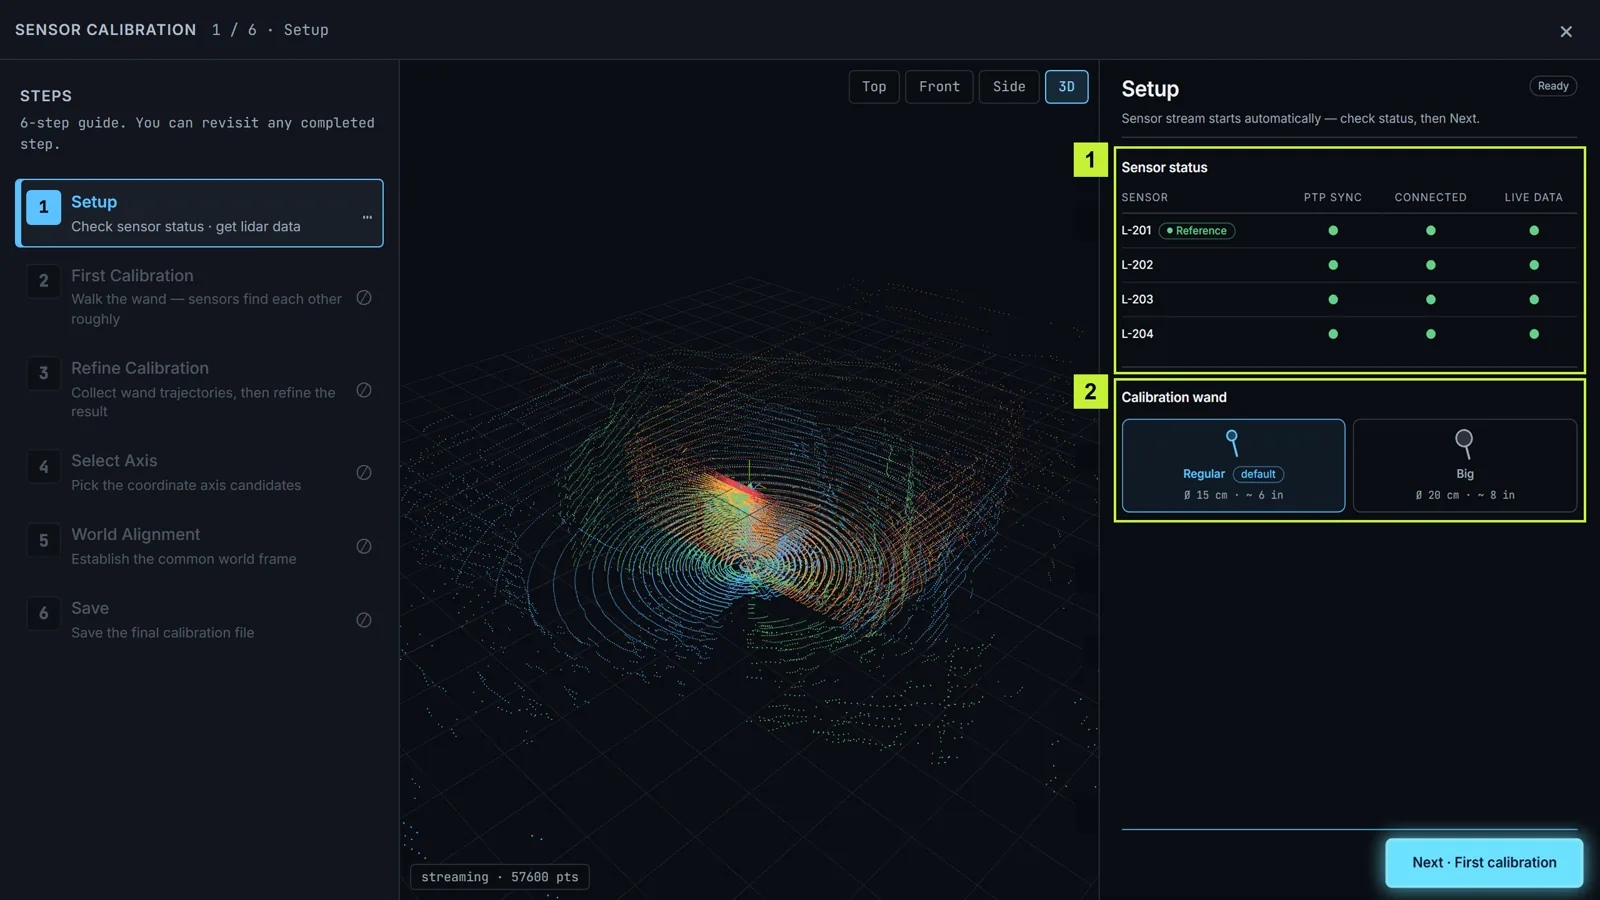
- Confirm PTP sync, Connected, and Data are green for every sensor. The Reference sensor is chosen automatically. If one does not turn green, see Troubleshooting.
- Select Regular for the 15 cm wand in the kit (the default). Select Big only for a 20 cm wand.
2 · First calibration
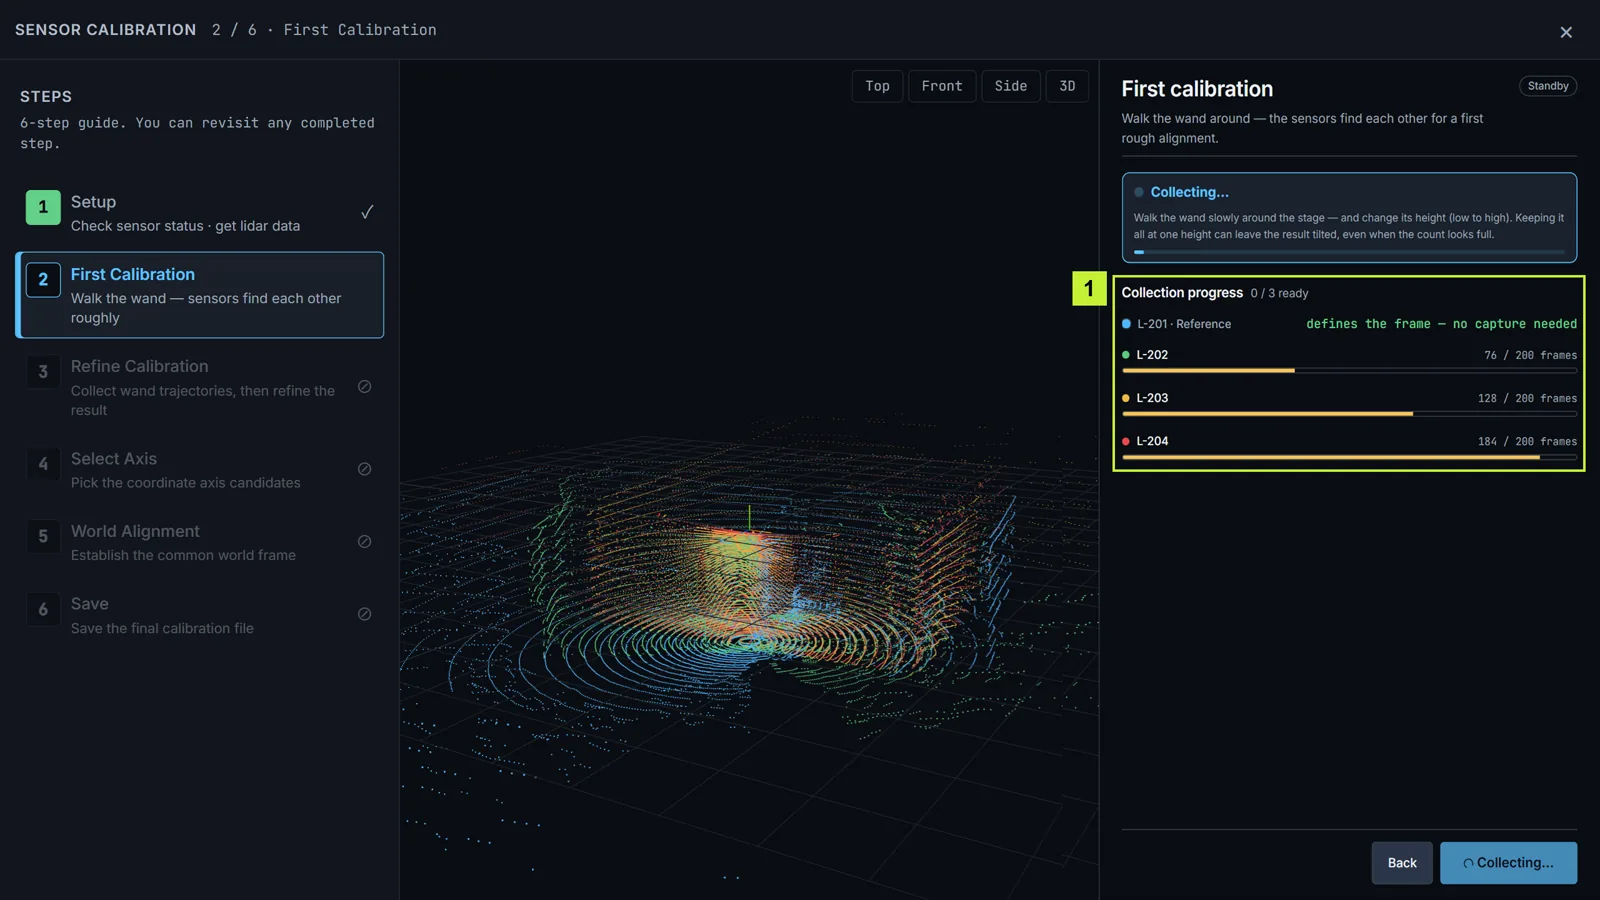
- Select Start collection. A wand reminder appears — select Start collection again to begin.
- Walk the wand slowly around the whole stage.
- Vary its height as you walk, from near the floor to overhead.
Collection stops on its own once every sensor's estimate settles. There is no stop button.
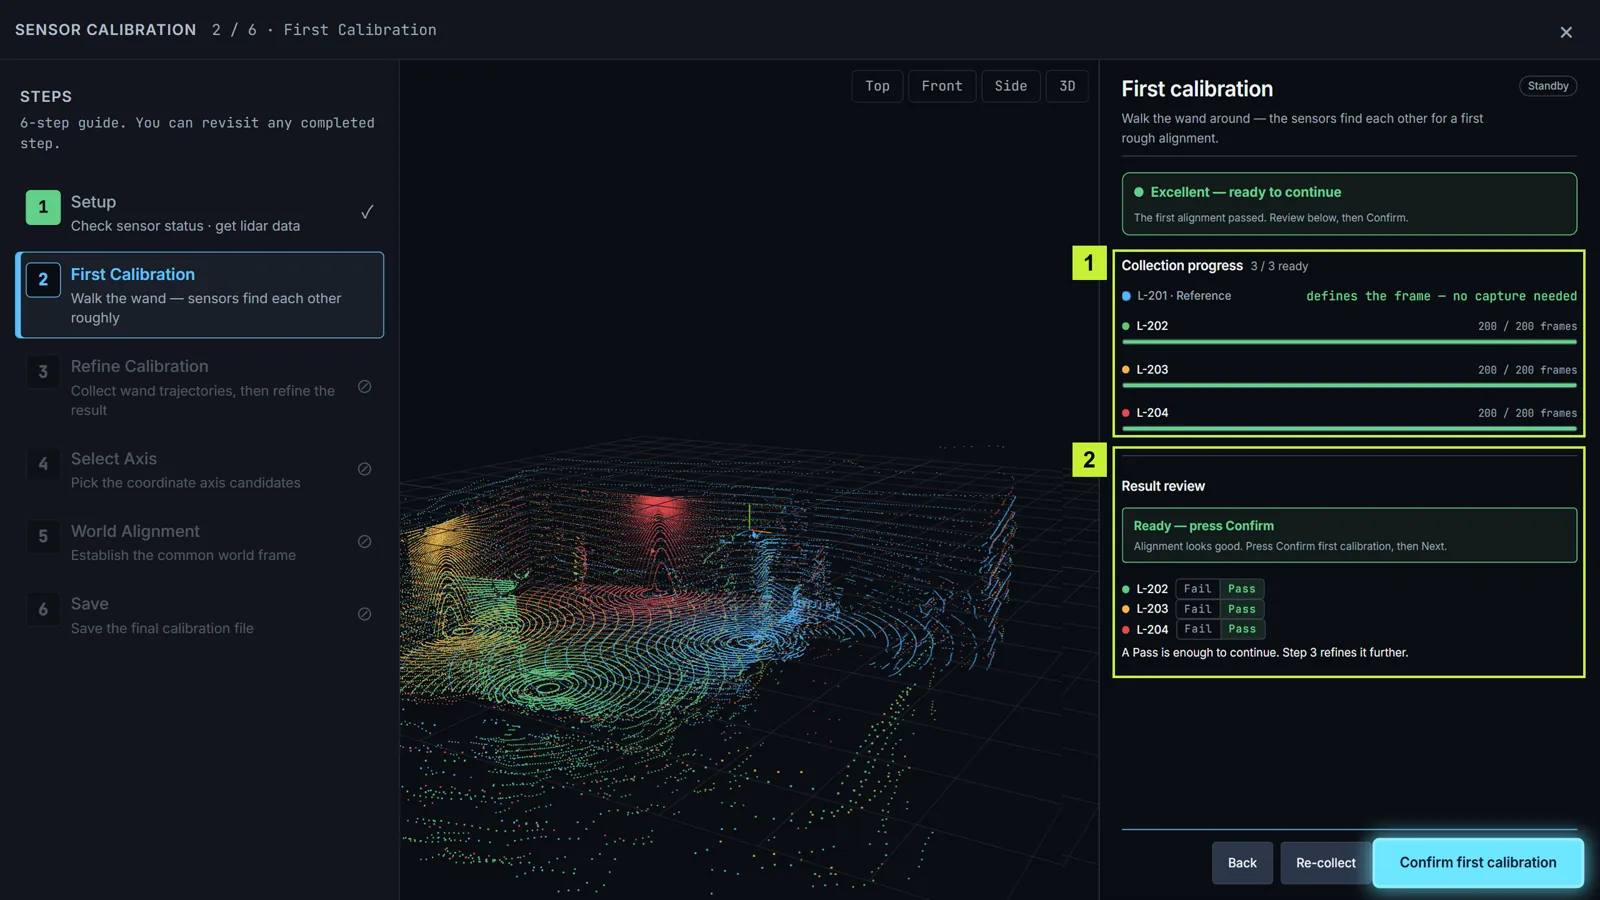
- Confirm every sensor is ready under Collection progress.
- Check Result review. A Pass is enough — collect again only if a sensor fails.
- Select Confirm first calibration. The wizard continues to Refine calibration on its own.
If collection does not finish
Under Collection progress, find the sensor that is not progressing. Move the wand through shared views of at least two neighboring sensors and vary its height. If only one sensor stops progressing, check its view, obstructions, and cable. If progress remains stuck, send the screen and sensor status with the support details. Closing the wizard discards the unsaved collection.
3 · Refine calibration
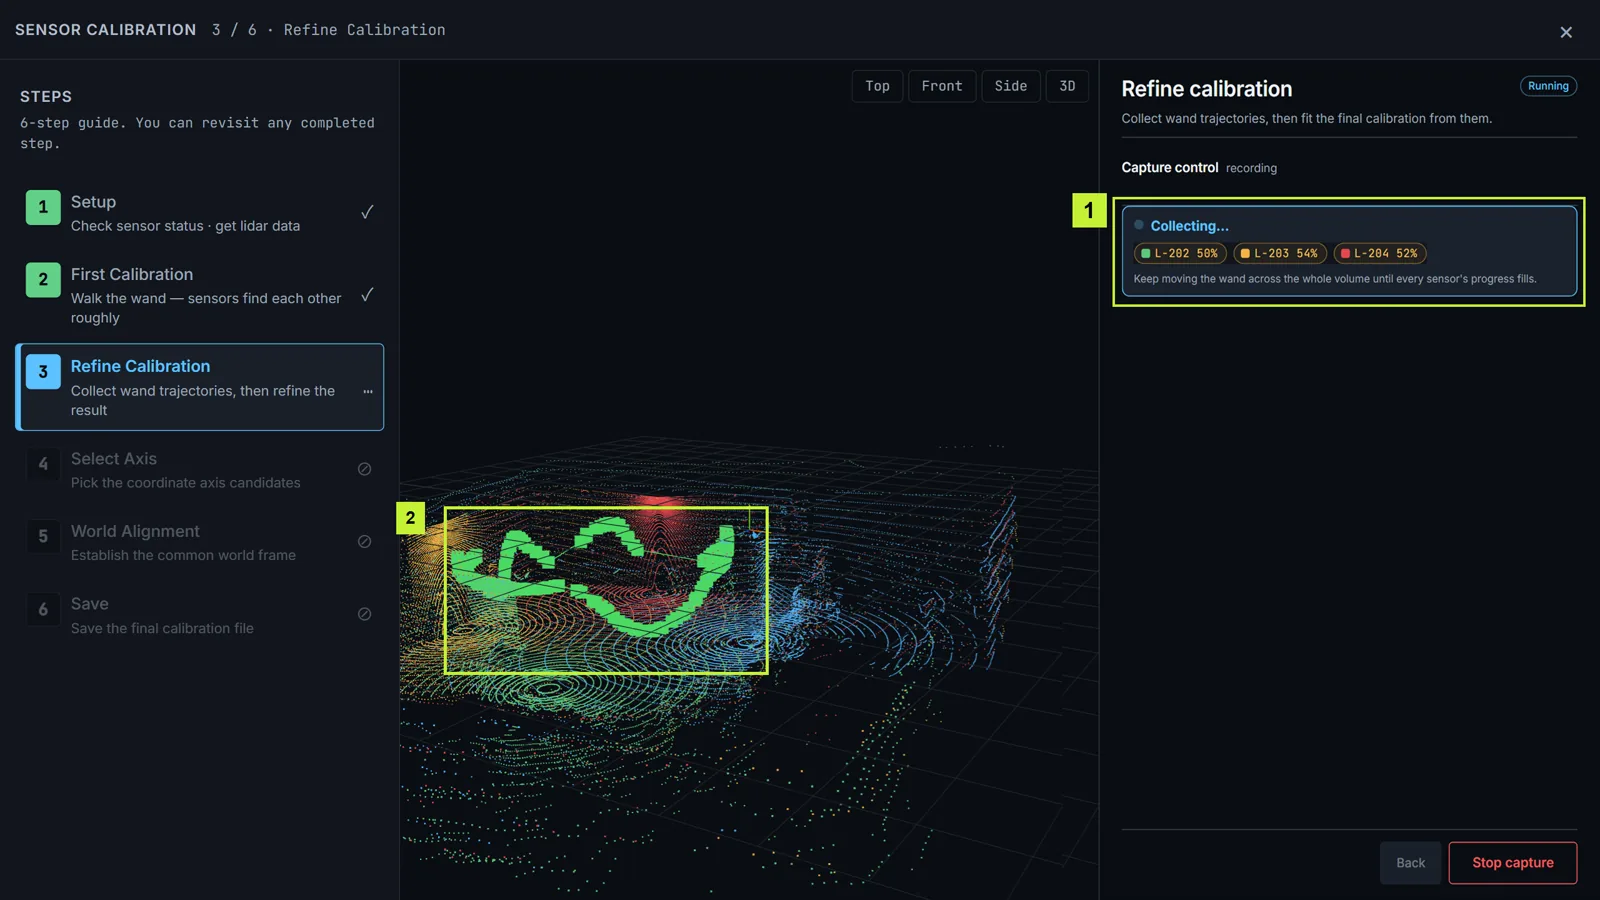
Unlike First calibration, this step waits for you to stop it.
- Select Start capture. The same wand reminder appears — select Start capture again to begin.
- Move the wand side to side, front to back, and low to high.
- Watch the viewport — the trajectories should cover the full working volume, not one small area.
- When Enough data — press Stop when ready appears, select Stop capture.
- Select Refine calibration. Stopping alone does not calculate the result.
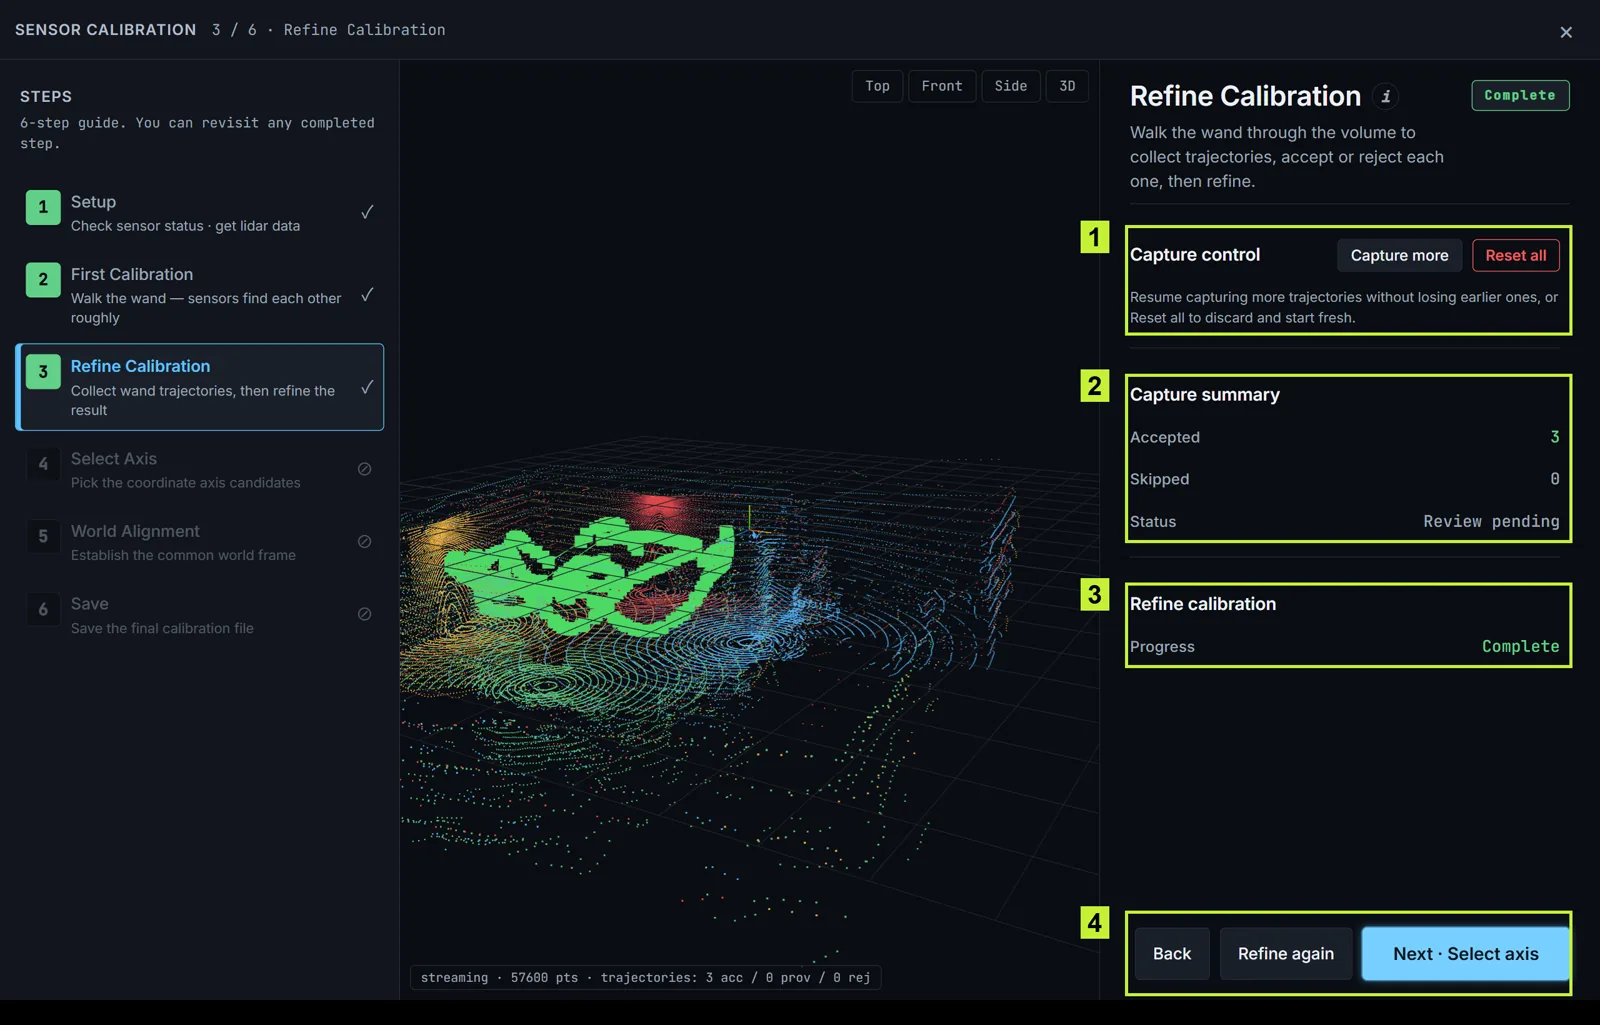
A completed refinement is ready for axis selection.
When Refinement shows Complete, select Next · Select axis.
To add coverage, select Capture more, collect, select Stop capture, then Refine again. Reset all discards everything in this step.
4 · Select axis
Set three points in order: Origin, Right, and Forward. Put the Origin at the center of the capture space and stand there facing the audience — Right is your right, and Forward points toward the audience.
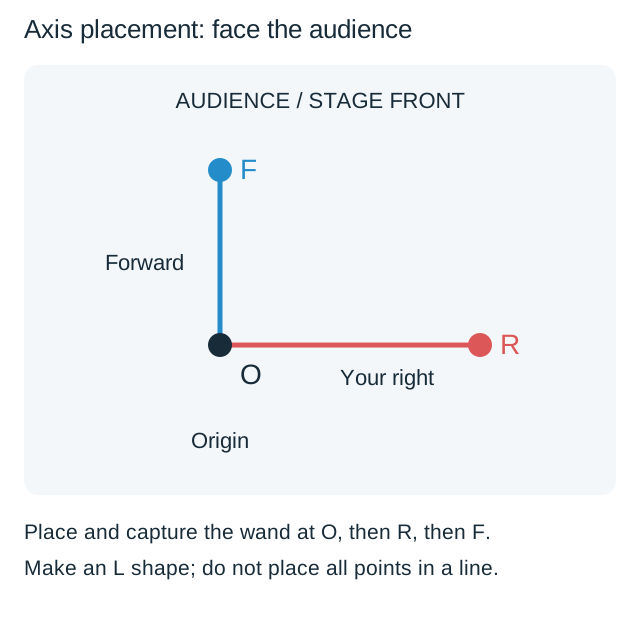
Wand placement for the three axis points.
- Select Start origin capture.
- Place the wand at the origin and step away.
- Confirm Placed — start capture, then leave the wand still until the candidate list appears.
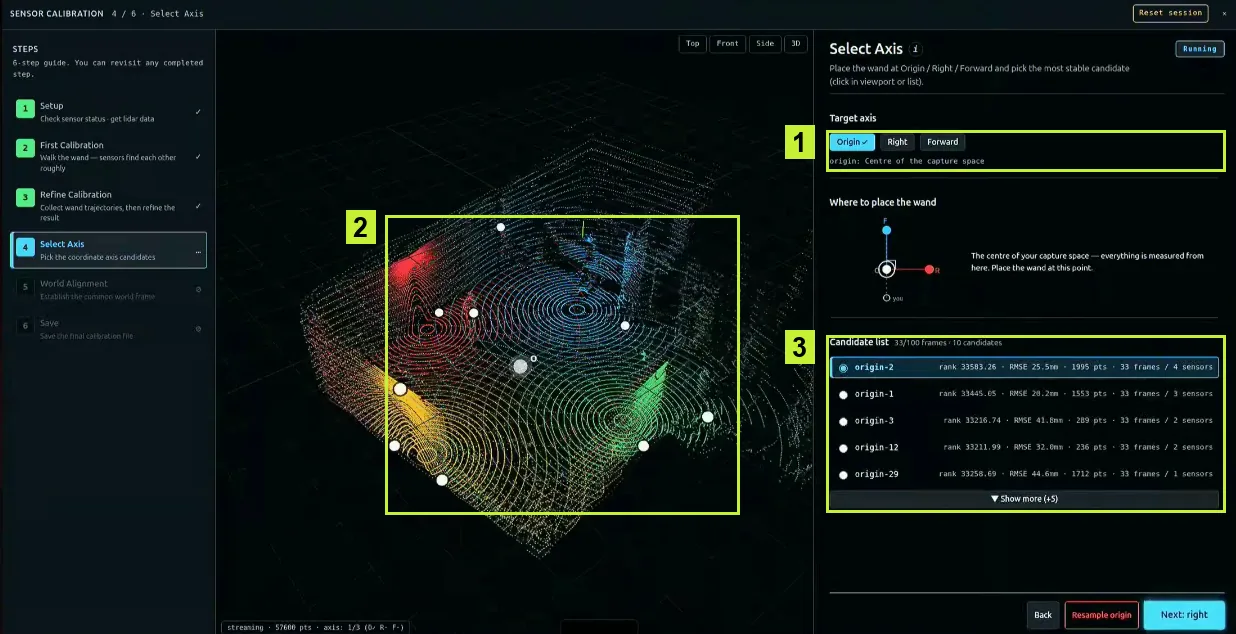
Candidate list after the origin capture.
- Verify the selected marker against the real wand position; choose another candidate if needed.
- Select Next: right, move the wand to the right-hand spot, and repeat with Start right capture.
- Select Next: forward, then repeat at the forward spot with Start forward capture.
- Once all three points are selected, select Next · World alignment.
Use Resample on a target if you need to capture it again.
5 · World alignment
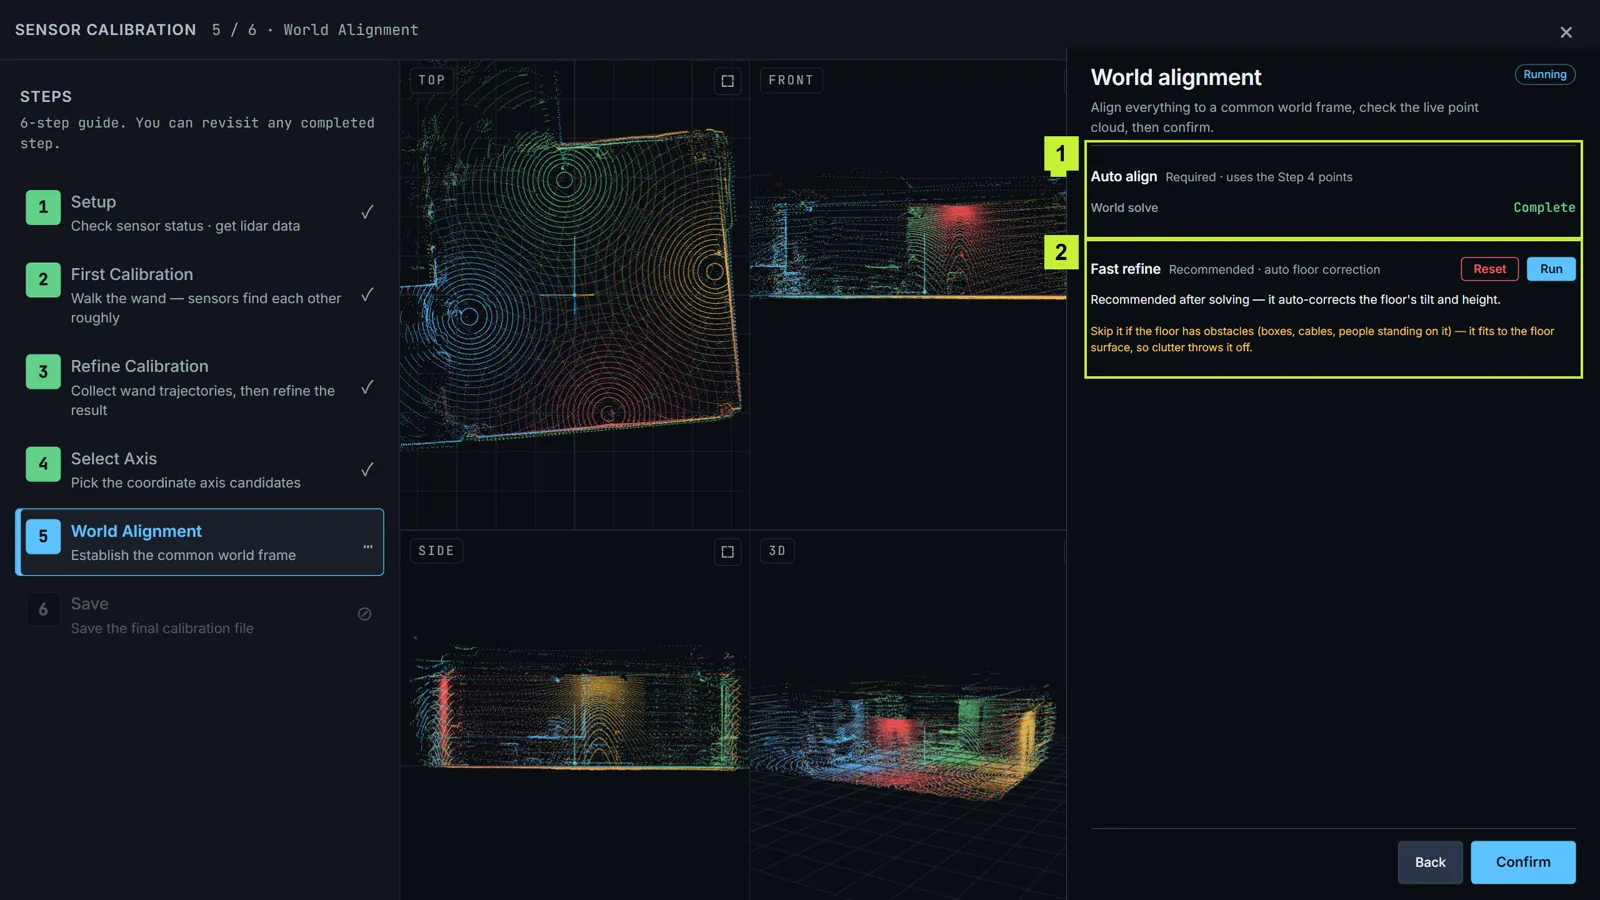
World alignment in the four views.
World solve runs on its own when you enter this step.
- When World solve shows Complete, check the Top, Front, Side, and 3D views.
- If the floor looks tilted or sits at the wrong height, clear the floor and select Run under Floor fix.
- Select Confirm. It may stay disabled for a few seconds — wait for it.
Check before saving
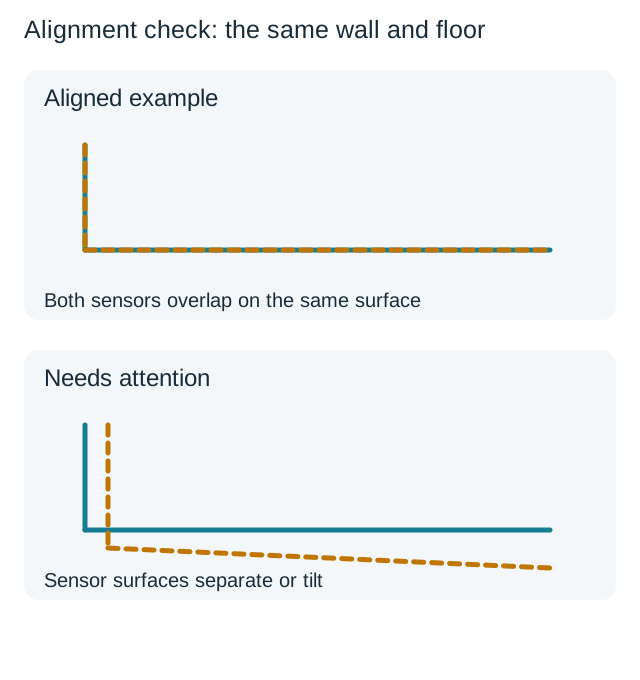
Aligned surfaces (left) and surfaces that need attention (right).
| Check | Ready to save | Needs attention |
|---|---|---|
| Sensor views of the same floor or wall | Overlap as one surface | Separate doubled surfaces: check for sensor movement and recalibrate |
| Stage floor in Front and Side | Level and at the intended floor height at the origin | Tilted or offset: clear the floor, run Floor fix, then check again |
| Origin, right, and forward | Match your physical O/R/F placements | Wrong direction: revisit the selected points in Select axis |
Check the scene against your stage rather than trusting the Complete status alone, then select Next · Save.
6 · Save
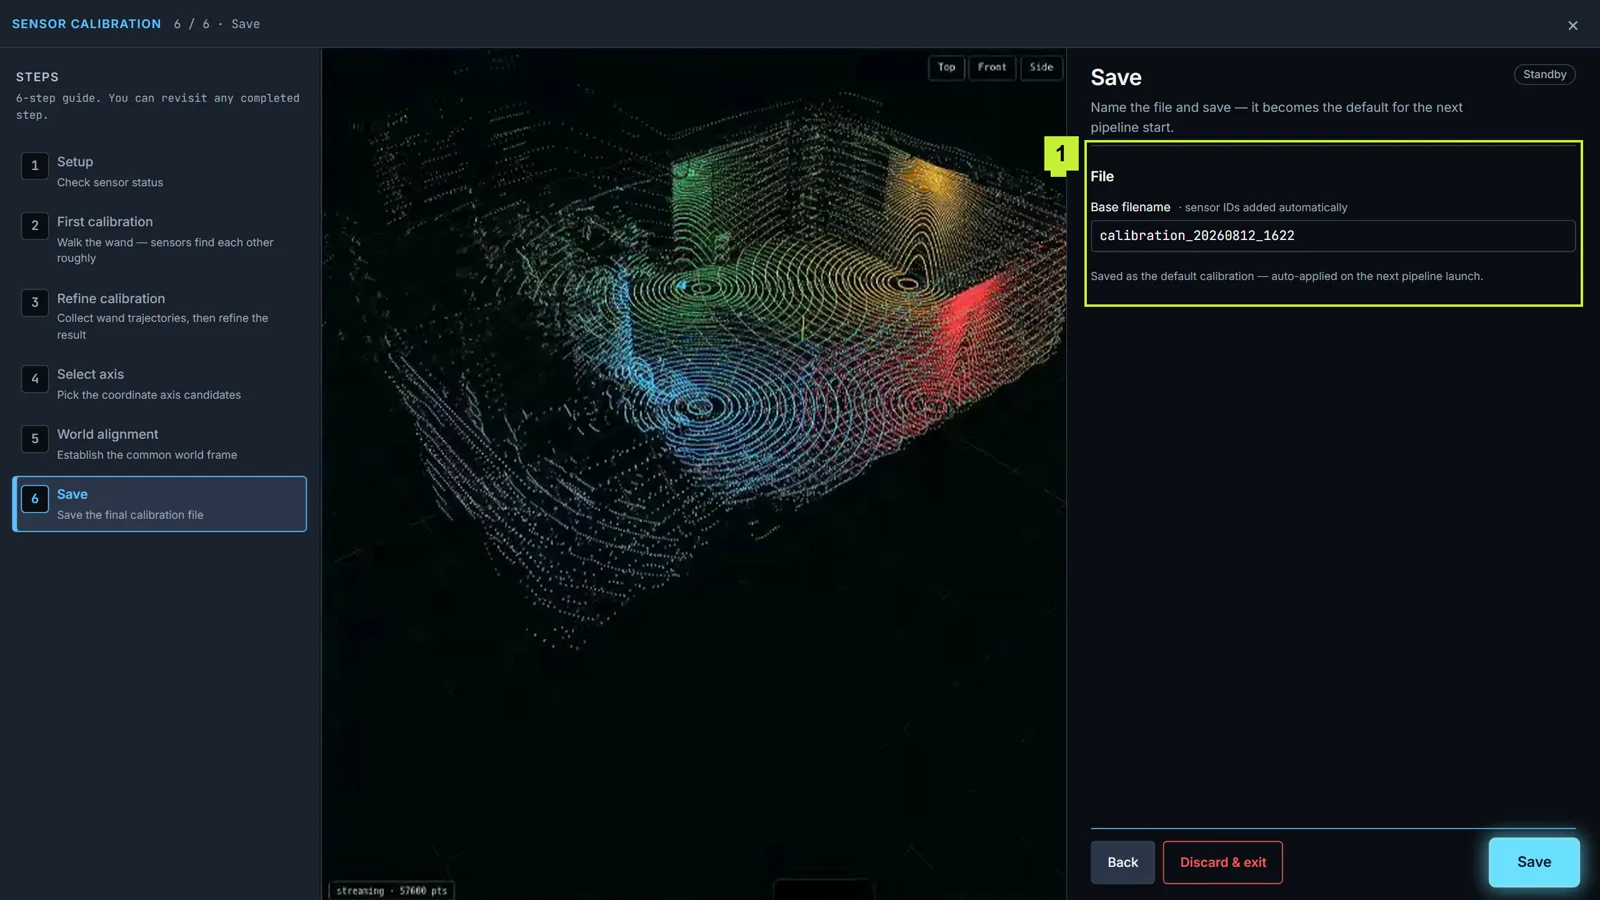
Keep the suggested filename or enter your own, then select Save. The saved file becomes the default for the next pipeline start.
Discard & exit clears everything from this session — the wand paths, the axis points, and the refined result. Closing the wizard with × does the same. Save first if you want to keep the work.
Adjust the stage alignment only
Sometimes the sensors are fine but the stage isn't. The floor sits at the wrong height, the scene leans, or forward points the wrong way.
You can fix that without collecting wand data again:
- With the pipeline stopped, select Calibration → Align world. The saved sensor positions are kept — you go straight to World alignment.
- Adjust the floor and the forward direction, then save.
Select Recalibrate instead when a sensor has moved, a sensor was added or removed, or surfaces look doubled. Those need the full run.
Align world appears only when a calibration is already saved, and only while the pipeline is stopped.
Continue to Stage 2 · Settings.