MOVIN TRACIN Stage · Setup
The workspace screen
On this page
The workspace opens automatically on the monitor connected to the server when you turn it on. If it is not open yet, follow Connect and power on.
For your first setup, find Calibration on the left and follow its Next step. The center shows the scene; the right panel contains controls for the selected step.
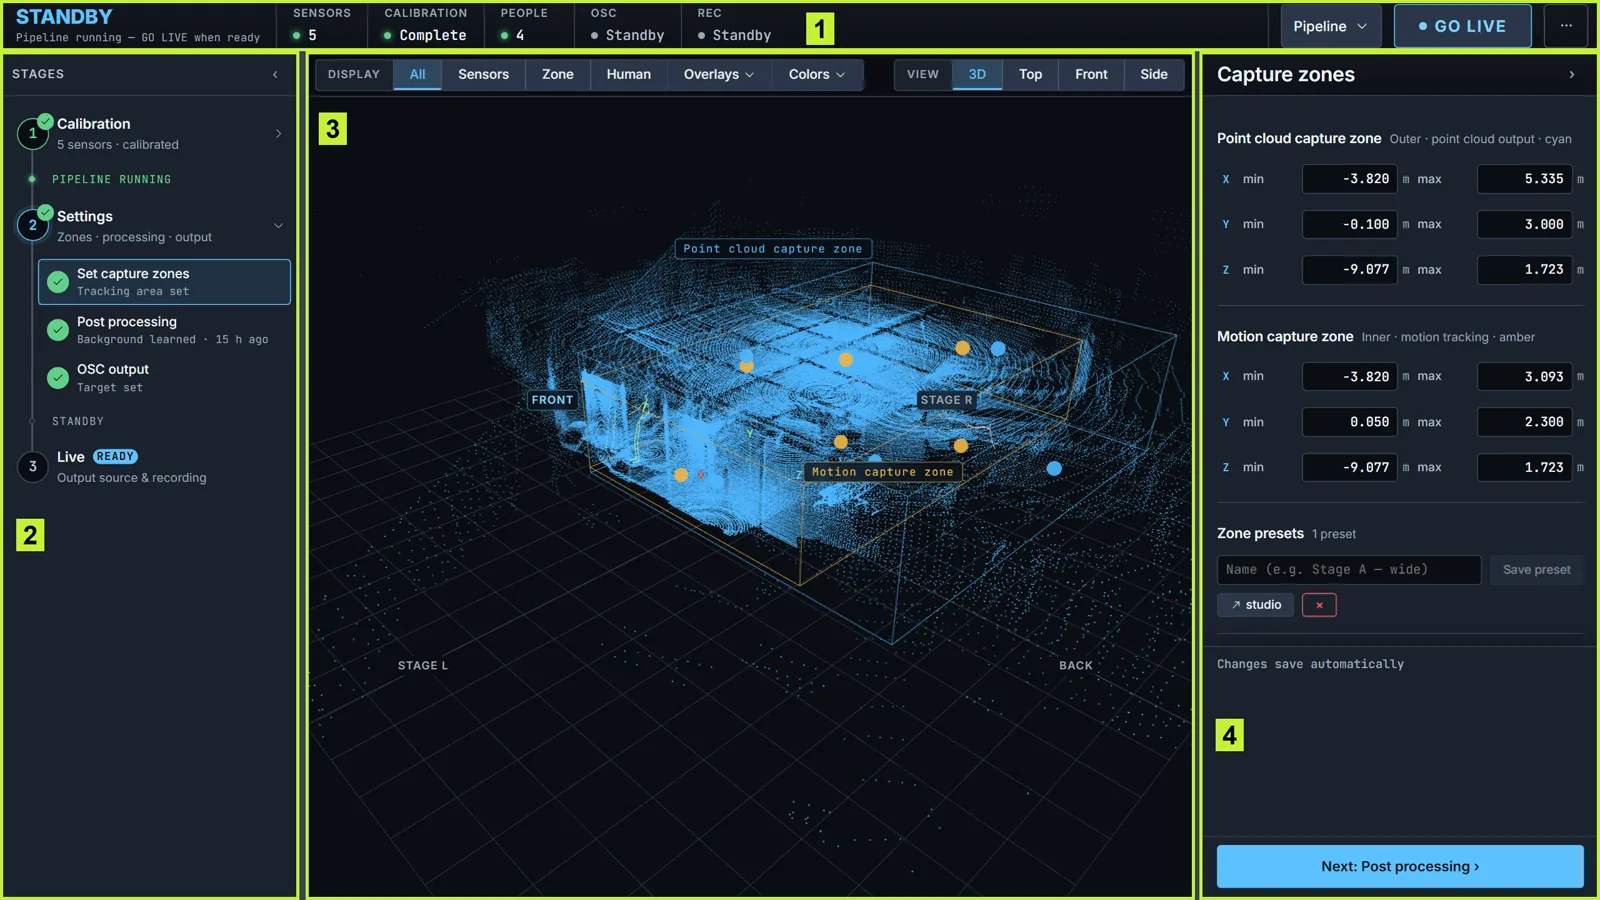
The four areas: 1 the top bar, 2 stage navigation, 3 the viewport, and 4 the inspector.
The screenshot shows Settings with preview running. On first boot, the cloud and the completion marks may not appear yet.
1 · Top bar — system status
System status — the current state, as a single word. The line below names the next thing to fix, or shows the elapsed time once the show is live.
- SETUP — setup is incomplete.
- READY — ready to start.
- STANDBY — previewing live data; nothing is broadcast.
- LIVE — broadcasting.
- FAULT — a problem needs attention.
Status indicators — hover over one for details.
- Sensors — how many are connected. Becomes
3/4if one stops sending during a show, and turns orange if a sensor has tilted. - Calibration — Complete or None.
- People — how many people are tracked right now.
- OSC — Live with the destination, or Standby.
- Rec — an elapsed clock while recording.
Controls — GO LIVE starts broadcasting and becomes END LIVE while on air. While the pipeline is running, the Pipeline menu holds Restart and Stop pipeline. The ⋯ menu holds the server controls and Show welcome.
Opening the Settings stage starts the system in preview. After Stop pipeline, a Start pipeline button appears in the same place.
2 · Stage navigation (left)
Complete the three stages in order: Calibration, Settings, and Live.
- A completed stage shows a check mark. Calibration and Settings expand to show their sub-steps.
- A Next tag marks the next required step.
- A locked stage isn't available yet — hover over it to see why. Calibration locks once the pipeline is running and shows a 🔒 icon.
3 · Viewport (center)
The live 3D point cloud, with the capture zones drawn over it.
The Display control picks which point cloud is drawn — All, Sensors, Zone, or Human — and holds two drawers: Overlays shows or hides the point cloud, each capture zone, and the mocap skeletons, and Colors names which color belongs to which sensor and which zone. Display only changes what you see — never what the show receives.
Voxelization shows on Zone and Human only, and background removal on Human only. If the cloud looks unfiltered, check this control before changing the filters.
If a sensor stops sending during a show, an alert appears in the viewport — see A LiDAR offline alert appears during a show.
4 · Inspector (right)
A context panel that displays the controls and details for the selected item — a stage guide, the sensor list, the zones, the OSC output, and so on.
First launch
The first time you open the workspace, a welcome screen explains what the app does. Select Got it to dismiss it, then begin from the Calibration stage on the left. You can reopen it any time from the ⋯ menu → Show welcome.
Continue to Stage 1 · Calibration.