MOVIN TRACIN · MOVIN Studio Usage Guide
Create and Calibrate Actor
On this page
Goal of this chapter: The performer has their own actor, selected and ready to capture.
Everyone's body is different - height, limb length, joint positions. In MOVIN Studio, an actor is a profile of the performer's body. MOVIN Studio creates it from a quick 3-second A-pose calibration and uses it to track that person accurately.
New performer? New actor. Using another person's actor causes mismatched joints and body proportions, which lowers the quality of your motion data.
Before you start: dress for mocap
💡 Quick reminder from Before You Get MOVIN: MUST-Read. What the performer wears affects tracking accuracy.
- Actor in slim-fit clothing, with trouser hems clear of the shoes
- Compression wear, muscle-fit tops or leggings for the actor
- Long hair in a bun; a beanie or short-brim cap if headwear is needed
How to calibrate an actor: Step by Step
-
Click Calibrate Actor
- In Capture, open the Actors tab in the left panel and click Calibrate Actor.
- The notification shows Please stand in center to calibrate actor.
-
Walk to the center of the Mocap Zone
- Follow the guide on the screen. It tells you where to go, e.g. Move to the center of the mocap zone, Step back or Step left.
- Watch the circle at the center of the zone:
- Red: you're not in position yet - keep moving to the center.
- White: you're in the center - take an A-pose.
- Changed your mind? Click Cancel Calibration on the screen.
-
Hold an A-pose for 3 seconds
- When the screen shows Take an A-pose, stand with your arms angled down at about 45° and your palms facing forward, then hold still for 3 seconds.
- When the center circle turns yellow-green, calibration is in progress - stay still until it's done.
- Moving or breaking the pose lowers the quality of your actor.
-
Name your new actor
- The new actor appears in the list, selected.
- Type the performer's name so you always know which actor was used for each recording.
Calibration doesn't look right? Calibrate a new actor, then delete the old one.
Fine-tune the actor with Pose Adjustments
If parts of the body look bent or tilted even after calibration, adjust the actor in the Details panel on the right. Changes are saved to the actor.
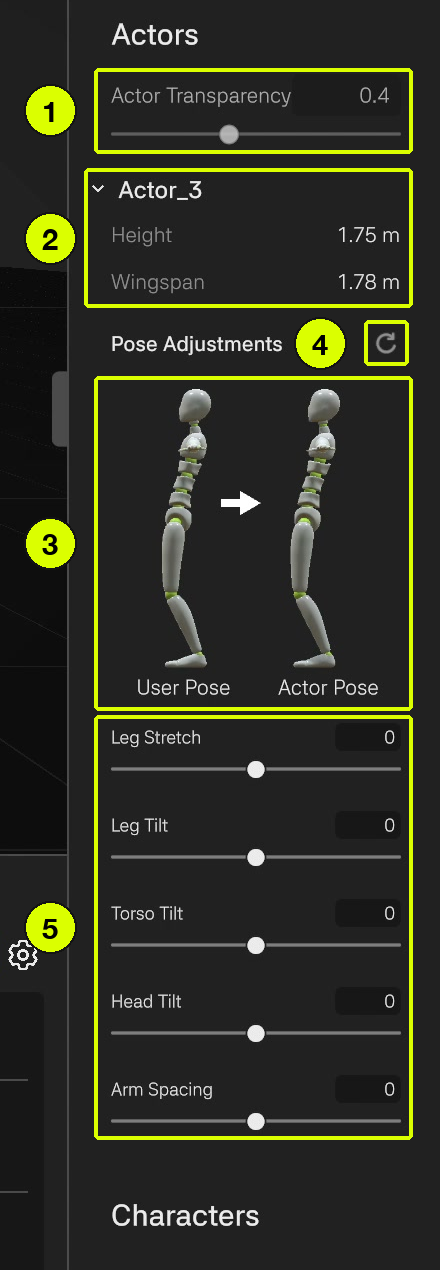
- Actor Transparency: fades the actor in the 3D view - useful when a character is loaded and you want to see it clearly.
- Actor info: the selected actor's height and wingspan, measured during calibration.
- Preview: shows how your adjustments change the pose - User Pose (as tracked) → Actor Pose (after adjustments).
- Reset (↻): sets all adjustments back to 0.
- Adjustment sliders:
| Slider | What it corrects |
|---|---|
| Leg Stretch | How far the legs extend. − bends the legs more, + straightens them. |
| Leg Tilt | How far the lower body leans. − leans it forward, + leans it back. |
| Torso Tilt | How far the torso leans, pivoting at the hips. − leans it back, + leans it forward. |
| Head Tilt | How far the head tilts. − tilts it up, + tilts it down. |
| Arm Spacing | How far the arms sit from the body. − moves them closer, + moves them farther away. |
💡 Hover over a slider's name in MOVIN Studio to see the same explanation.
Manage your actors
All actors are listed in the Actors tab and stay saved in the project, even after you quit MOVIN Studio.
- Select an actor: double-click it. A check mark appears, and Puppet Mode turns off. Double-click it again to deselect it.
- Rename: right-click the actor and select Rename, or click it slowly twice.
- Delete: right-click the actor and select Delete. To delete several at once, hold Ctrl and click each actor first.
Your actor is ready. Next, check your hand tracking options, then start recording.
→ Recording