MOVIN TRACIN · Setup & Installation
Set up your Mocap Zone
On this page
Goal of this chapter: TRACIN understands your space, and the Mocap Zone is saved and ready to capture.
The Mocap Zone is the area where TRACIN detects and tracks human movement. In this step, you define its size and position, and align TRACIN with your floor - so it reads your space accurately.
See it in action. Watch the full Mocap Zone setup in our live demo.
Before you start: prepare the space and your actor
💡 Quick reminder from Before You Get MOVIN: MUST-Read. A clean space now means a cleaner mocap zone later.
- The zone is completely clear - no furniture, boxes, bags or other objects
- At least 1.2 m (4 ft) between TRACIN and the front of the zone
- No mirrors, Scotch tape or other reflective surfaces in the zone
- Floor mats secured on carpet, marble, glass or soft floors
- Actor in fitted, non-reflective clothing, with trouser hems clear of the shoes and long hair in a bun
Get to know the Setup Mocap Zone screen
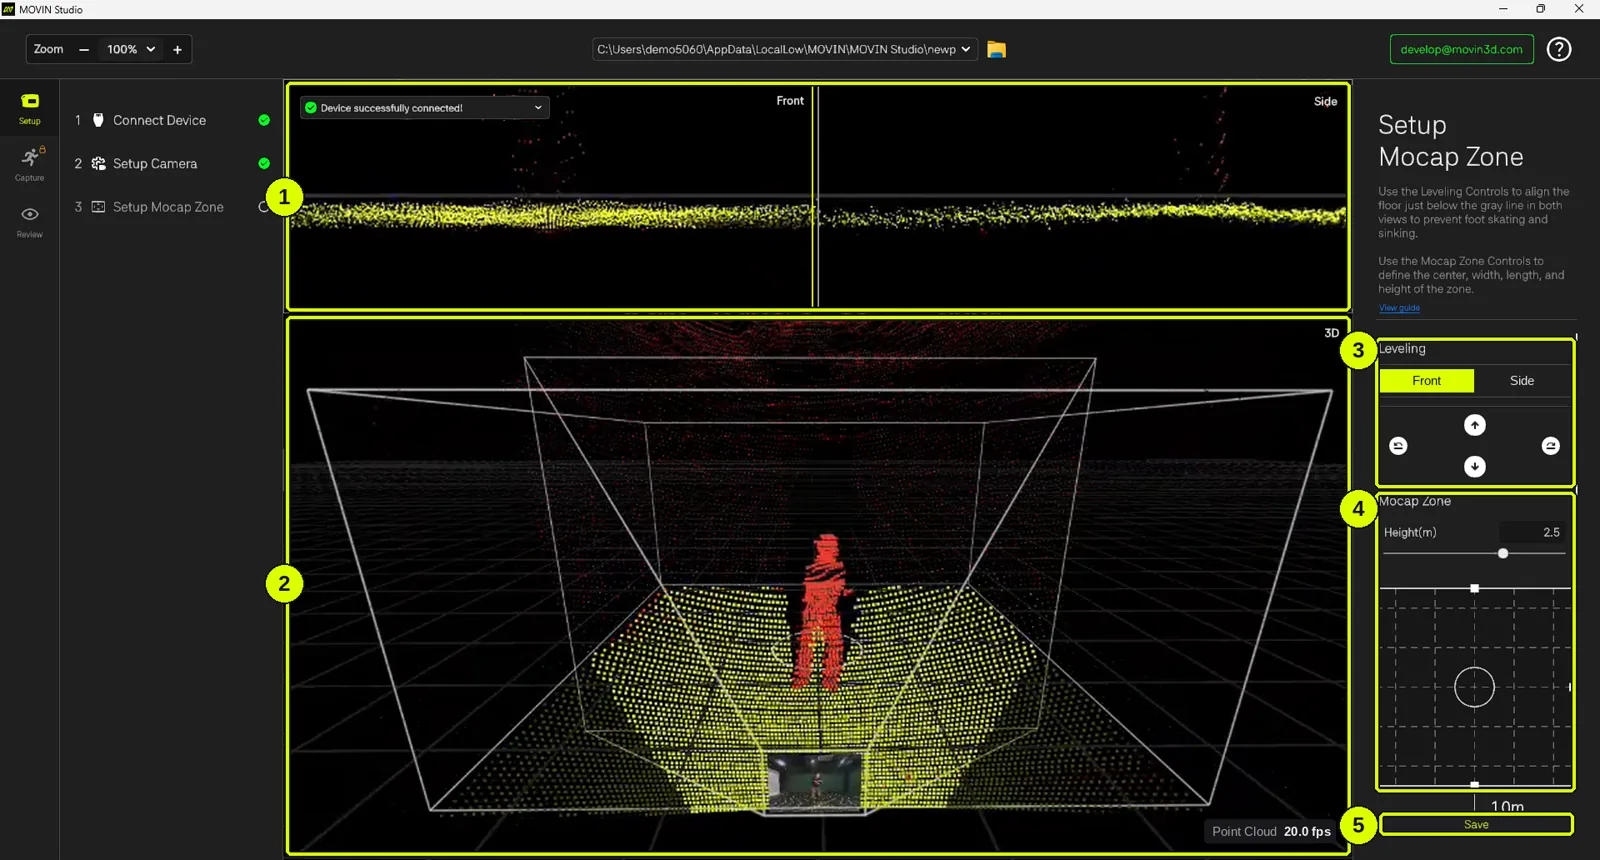
- Front and Side views (top): the floor TRACIN measures, shown as a point cloud from the front and from the side. A gray guideline runs across each one.
- Red points: the point cloud is too far above or below the gray line.
- Yellow points: the point cloud sits just below the gray line - this is the goal.
The gray line at the center of both views is your key reference - use it for accurate ground alignment.
- 3D view (center): TRACIN's raw LiDAR point cloud data.
- The white box in the center is your Mocap Zone.
- Floor points turn from red to yellow as the floor is aligned.
- People and objects in the zone appear as red points.
- The small rectangle in front of TRACIN shows the current camera view.
- Bright vs. darker points: Bright = inside the zone and seen by the camera. Darker = outside the zone or in the blind spot of the camera.
- Leveling controls (right): choose Front or Side, then use the arrows to move the floor up or down and rotate it - to align the ground just below the gray line.
- Mocap Zone controls (right)
- Height (m) slider: sets how tall the zone is.
- Bird's-eye view: drag the border lines to set width and length, and drag the center circle to move the zone's center - this is where your actor stands to start capturing.
- TRACIN's position is shown below the map.
- Save / Edit / Next (bottom right): save the zone, edit it later, and continue.
How to Setup Your Mocap Zone: Step by Step
-
Clear the zone
Remove all objects from the Mocap zone
- To start motion capture, the Mocap Zone must be completely cleared.
- Please remove all objects from the zone you plan to capture in.
If there are objects in the motion capture area that cannot be removed, please reduce the size of the motion capture area (see Step 2)
-
Set the width, length and center of the Mocap Zone
- In the bird's-eye view, drag the border lines to set the zone's width and length.
- Drag the center circle to move the zone's center. This is where your actor will stand to start capturing.
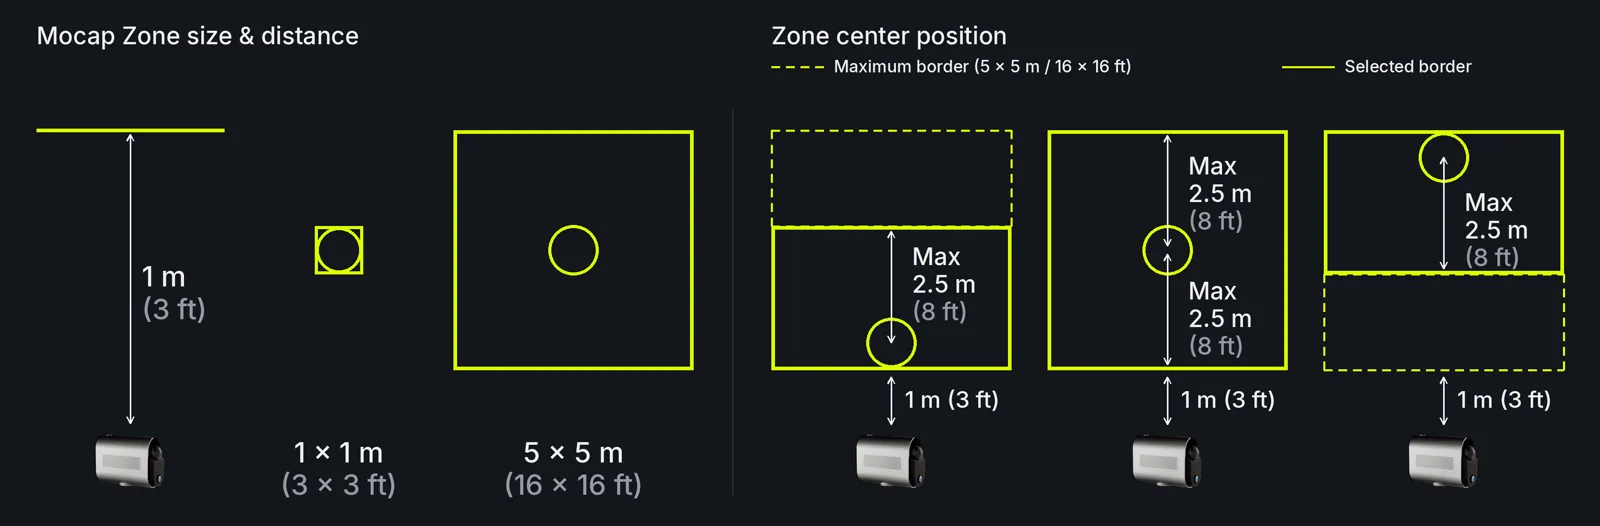
- Zone size: from 1 × 1 × 1.5 m (3 × 3 × 5 ft) up to 5 × 5 × 3 m (16 × 16 × 10 ft) (W × L × H).
- Distance from TRACIN: at least 1.2 m (4 ft).
- Zone center: can be offset 0.5 – 2.5 m (20 in – 8 ft), and placed 1.5 – 5.5 m (5 – 18 ft) from TRACIN.
💡 Size the zone to your space and your moves. More room means bigger movement - but keep every edge clear of walls and objects.
-
Adjust the height
- If the ceiling is detected inside the zone, it appears as red points.
- Lower the Height (m) slider until the red points disappear.
-
Level the floor in both (Front and Side) views
- Click Front. Use the rotate buttons (clockwise / counterclockwise) to make the floor point cloud as level as possible.
- Use the up / down arrows to place it just below the gray line.
- Click Side and repeat.
- Done when the floor inside the zone fills with yellow points. A leveled floor prevents foot skating and sinking in your motion data.
-
Step out of the zone, click Save, then Next
If there are objects in the mocap zone, please move them outside.
- Step out of the zone so it's completely empty, then click Save.
- When the zone outline turns green and the notification shows Mocap Zone setup is completed., you're done.
Red points still inside the zone? An object is still inside, and you can't continue yet. Click Edit, adjust the zone so nothing is inside, and click Save again.
- Next appears only when there are no red point clouds inside the Mocap Zone.
- Click Next to proceed to the next step.
You are DONE with Setup!
Next, calibrate your actor and start capturing - 3 seconds is all it takes
→ Create and Calibrate Actor