MOVIN TRACIN · MOVIN Studio Usage Guide
Get to Know MOVIN Studio
Goal of this chapter: You know where everything is in MOVIN Studio, so the rest of this guide is easy to follow.
MOVIN Studio turns what TRACIN sees into motion data. You can record it as clips, retarget it to your own characters, export it to your 3D tools and live-stream it to other apps - all from one window.
Three tabs, three jobs
The sidebar on the far left switches between the three main screens.
| Tab | What you do here | Learn more |
|---|---|---|
| Setup | Connect TRACIN, set up the camera and the Mocap Zone. | Connect TRACIN to MOVIN Studio |
| Capture | Calibrate actors, load characters, record, and live-stream. | Create and Calibrate Actor, Recording |
| Clips | Play, trim, retarget, export and stream recorded clips. | Play, Export and Stream Mocap Clip |
Capture stays locked until Setup is complete. If you click it too early, the notification shows Complete device setup in Setup before using Capture. Clips works anytime - even without TRACIN connected.
Get to know the Capture screen
You'll spend most of your time here.
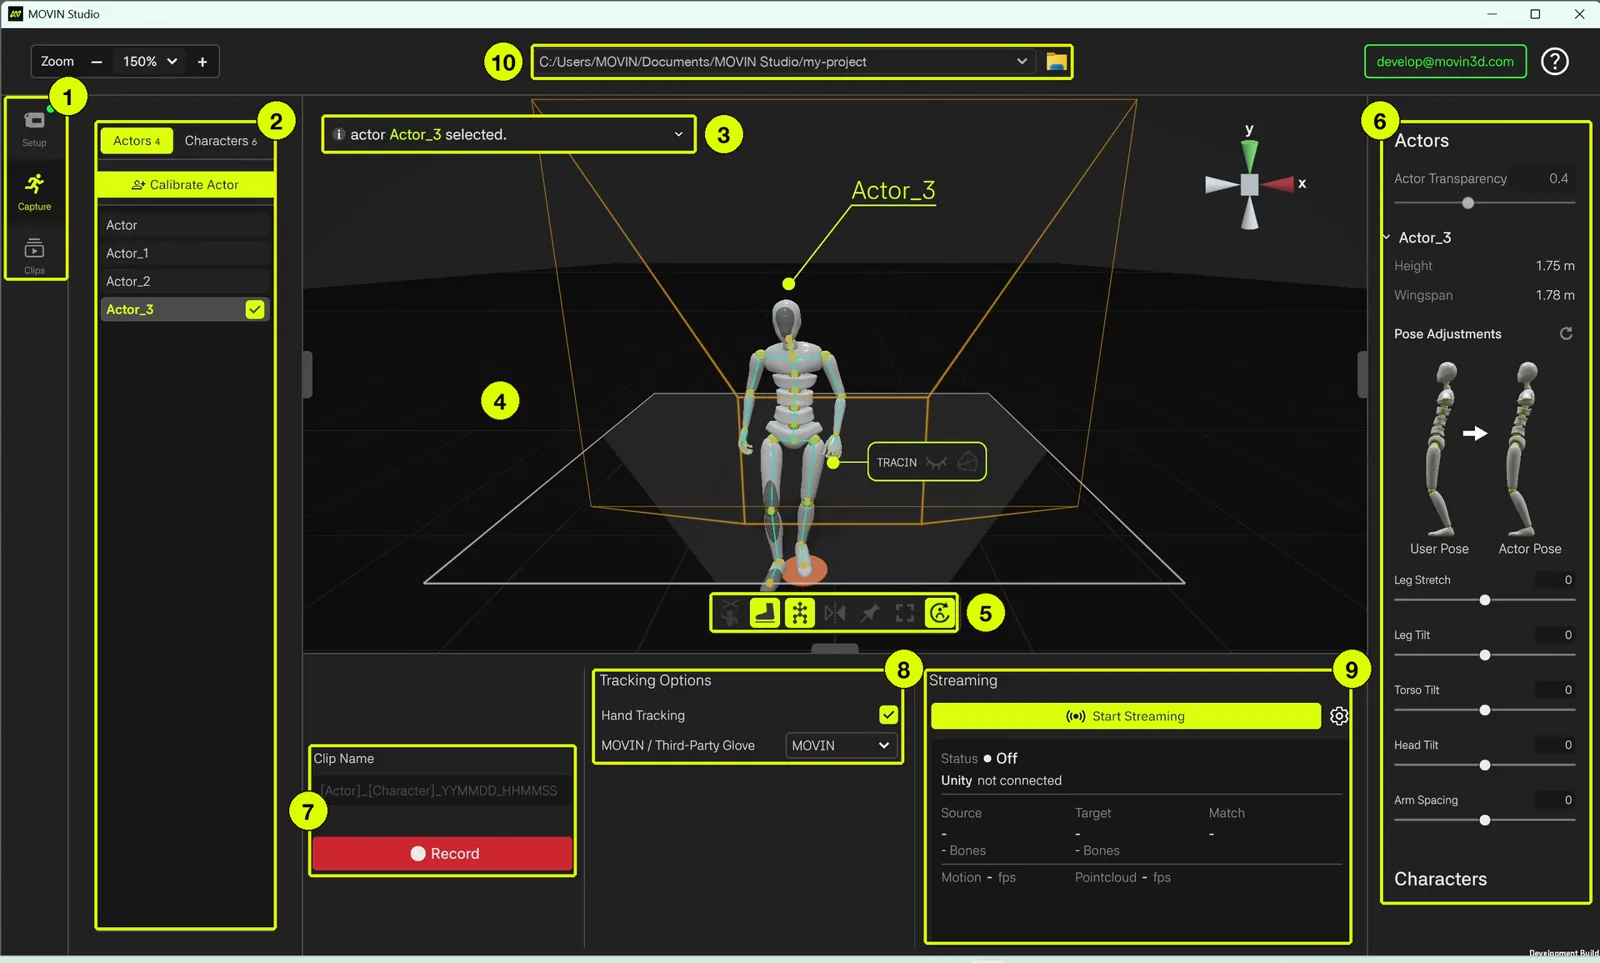
- Sidebar (far left): switch between Setup, Capture and Clips. A green dot on Setup means TRACIN is connected and setup is complete.
- Actors / Characters panel (left): the Actors tab lists your calibrated actors and holds the Calibrate Actor button. → Create and Calibrate Actor
The Characters tab lists your imported characters and holds the Import Character button. → Import Character and Retargeting - Notifications: updates and errors from MOVIN Studio, e.g. actor Actor_3 selected. Click ⌄ to see the notification history.
- 3D view (center): the actor (or Puppet) moving live in your Mocap Zone, with TRACIN's position. The gizmo at the top right shows the view direction.
- Toolbar: quick tools to check your motion - Puppet Mode, Foot Contact, Skeleton and more. → Toolbar
- Details panel (right): settings for the selected actor (height, wingspan, Pose Adjustments) and the selected character (Retarget Settings). → Create and Calibrate Actor
- Recorder: name your clip and click Record. → Recording
- Tracking Options: turn Hand Tracking on or off, and choose MOVIN or a third-party glove. → Hand Tracking
- Streaming: start or stop live streaming, and click ⚙ to set the destination. → Live-streaming
- Project: the project you're working in. Click the folder icon to open its folder. → Project
The top bar also has Zoom (the size of MOVIN Studio's interface), your account button (click it to check your MOVIN Studio version) and Help (?).
Make room for the 3D view. Drag the edges between panels to resize them, and drag the handle above the bottom panel to resize or collapse it.
Move around the 3D view
- Zoom: scroll the mouse wheel.
- Pan: press and drag the mouse wheel.
- Rotate: right-click and drag.
- Snap to an axis: click an arrow of the gizmo at the top right to view from the x, y or z axis.
You know your way around! Next, learn about projects and the toolbar.
→ Project, Toolbar and Puppet Mode